Thursday, January 31, 2013

Project of the Day - Tupperware Cabinet

 Maybe you have a gorgeous, perfectly organized tupperware cabinet. I do not. Mine is a disaster. All the time. Today, I am going to try to tame the chaos.  We will see how that goes!
Here is the before picture:
There is a lot of stuff crammed in there. There are a few small appliances, some can coozies, and lots and lots of plastic containers and lots and lots of lids. Maybe, just maybe, some of them go together. Maybe.

The first thing I did is to empty the cabinet:
I ask you... does anyone really need this many plastic containers? If everything in my refrigerator was neatly contained in one of these AND Martha Stewart came over to my house to neatly place all the containers into my refrigerator, I would still have lots of leftover containers. Easily.

The next thing I did was to separate the containers from the lids. Then I organized the containers by shape - round, square, and rectangle.

Then, I paired each container with the matching lid. If there was no lid to match, the containers went into a pile. At the end, all lids that hadn't matched up with a container went into the same pile. I made one last ditched effort to pair up anything in that pile. No luck.
The above picture is the pile that had no match. This, my friends, is why my cabinet was so jumbled up and it took an act of Congress to find a lid and container to put my leftovers in each evening after dinner.
I found in the cabinet, half of an Easter egg. Doesn't everyone need a half of an Easter egg in their tupperware cabinet.

Next, I nestled all the of the containers inside other containers to save space, placing the coordinating lid directly beneath the container it goes with. Then, I put everything neatly back into the cabinet. Surprise! Surprise! Everything fit neatly in the cabinet.
Everything is easily accessible and each container is paired with the lid that fits. Putting away leftovers will be a breeze!!

Go - clean out your cabinet - you will be sooooo happy. I promise!

Wednesday, January 30, 2013

Room Mom? Valentine's Day Class Party Ideas!

Being a room mom for many years for my girls, I am always on the look-out for great class party ideas!  I ran across these and saved them for later... maybe you can use them too!

When it comes to party planning, nobody does it better than One Charming Party. Here is the Valentine class party they shared on their blog - awesome!


This site shares party hat ideas from paper plates - for every holiday!


I know I shared Bingo the other day, but I had to include it here since Bingo is my go-to class party game if there is extra time!


For older classrooms, these Mad Libs are perfect!!


Make and Takes is a great blog with tons of good ideas - she pooled together these great Valentine class party ideas:

Letter Match - pair up upper and lower case letters - great for lower grades!

Heart Lei made with yarn, straws and hearts!

Giant Tic Tac Toe - use posterboard and handmade felt hearts for the playing pieces. Make a few and you can have 4-6 kids playing at a time!

Three pipe cleaners and each kid gets a new pair of glasses to take home!

Put these together and the kids can put theirs together and then trade with another student for even more fun!


Tuesday, January 29, 2013

Even MORE Valentine Goodness!

 I think these would be great for the girls' teachers! We actually own the donut hole maker, so that would work!  She even includes printable labels!

What a neat idea this is - put a heart on your children's bedroom door each day with something nice about them. Start on February 1st and by Valentine's Day, they have a door full!

Love this idea! I wonder how much tic-tacs are at Costco? 

How neat are these Danish Heart Baskets? Love!

My next Valentine post will be filled with class party ideas!


Monday, January 28, 2013

More Valentine Goodies for you to Enjoy!

 Free Printable Valentine Bingo!


Aren't these paper candy hearts the best ever?


Did you realize how easy it is to make regular cupcakes into heart shaped ones? I didn't, but I do now!


How neat is this paper heart wreath


More valentine sharing in the next few days!


Friday, January 25, 2013

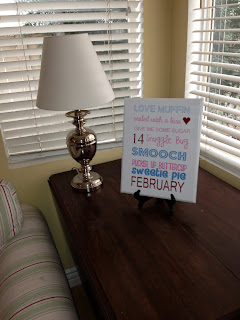
Project of the Day - Valentine Subway Art


 I haven't been quite as productive with the projects of the day this week - but I did get a couple of things started...
and one thing finished!  I completed a Valentine Subway Art Sign!

I used my Silhouette vinyl cutter and three different colors of vinyl to create the wording. I painted one of my wooden boards and then applied the vinyl to create the subway art sign. Viola!

If you would like one of your own, just email me missy@sweetfunkyvintage.com and I will invoice you - $35 for the sign ($11.50 for shipping if you aren't local).

The sign measures 10" x 13".


Friday, January 18, 2013

Project a Day - Toy Collection Bin

I don't know if you share my struggle, but if you have kids, I would imagine that you probably do. Which struggle do I speak of? The toys all over the place and nobody wants to pick up their toys struggle. Do you know that one?
I saw this idea on facebook, posted by a friend of mine...

And, I love this idea!  I am ready to try it because just a few weeks ago, we all cleaned out the playroom. We got rid of old, broken toys and toys that were outgrown and no longer played with. We trashed alot of broken crayons and papers and goodness only knows what!  Every toy that remained was put in its place. Bins were labeled, and everything was neatly organized.  How long did that last, you may ask. Well, not nearly long enough!  The Barbies were hanging out with the Groovy Girls and the Legos were hanging out in the kitchen. And there was trash and papers and a little of everything else just about everywhere else! Ugh!  
So, I have given warning. The kids must get serious about not leaving stuff out and when it is time to clean up, not throwing whatever it is into the nearest bin and calling it good!
Here is the sign I created, if you would like to print it out:
And here are the chores I created (and the pocket to put them in):

Here is my completed toy bin:


Wish me luck!


Thursday, January 17, 2013

Project a Day - A Birthday Gift

 One of my girls was invited to a birthday party this weekend. Since Christmas really blew our budget, I needed to come up with a cute idea for something that wouldn't break the bank!
I picked up a bunch of these buckets in pink and green awhile back at Ikea. The birthday girl loves hair bows and headbands and barrettes, so I used my Silhouette to label the bucket and filled the bucket with a few hair accessories!


Ta da!

Wednesday, January 16, 2013

Project a Day - Christmas Sign for 2013

 I realize it is January and a full 11 and 1/2 months until Christmas, but I thought I would get a head start!! Ha! Actually, I had intended (big surprise) to make this Rudolph sign over the holidays and it just didn't get done (again, big surprise).  My Dad was here and I asked him to prep me some plywood for the sign, and go ahead and make an extra board for my Mom too.  So, since these pretty, white boards were all prepped and ready and staring me in the face, I decided to get a jump on the Christmas holidays and go ahead and make them now!

I saw the sign on Pinterest originally, and the pin linked back here. It appears the original sign was painted on a 1/2" thick pine board, with some distressing.
I will be making my sign on 1/2" plywood, and using vinyl lettering instead.  But, I think the end result will be roughly the same.
I used my handy, dandy Silhouette cutter and cut out all of the lettering. Unlike my last project, I did all the words separately in order to not waste so much vinyl.  This lettering was going to be large enough to piece together with reasonable accuracy.
First, I placed the silver lettering for Rudolph.
Then, I added the big red circle for the O in Rudolph.

Here it is about halfway through. There was lots of measuring involved in this sign, so it took a lot longer to finish!
And, here it is all finished!  I still have to complete the one for my Mom, but I am pretty stoked to have a new Christmas decoration and it is only January! ;)


Tuesday, January 15, 2013

Project a Day - Family Sign

Today's project uses my Silhouette! I'm so excited to be using it to make something for my newly painted fireplace mantel!

I saw this sign first on Pinterest, but cannot link to it here, because Pinterest has flagged the original site as an unsafe link. Sorry about that!


I set up my laptop and silhouette on the kitchen island so I would have plenty of room to spread out and work!

I had a board that had been cut, sanded, and painted for a project that never quite got completed. So, I measured it and determined how big the lettering should be and how the spacing should be arranged.

I am a true novice at using my silhouette, so it is all a learning process for me. I decided to do the layout all in one, instead of piecing it all together. If I had smooshed all the lettering together and then cut it out and placed it on the board, I would definitely have used less vinyl. But, I'm just not that patient with measuring and placement, so I figured this was a better way to make it look neat.

Here it is with the vinyl cut out, and the negative vinyl removed.

Then, I applied the transfer tape. My silhouette came with all sorts of gadgets. I even know how to use some of them! My favorite is the dental pick looking thing - it is used to remove the insides of the o's and a's, etc.  This blue squeegee thing is used to really smooth on the transfer tape and the vinyl to whatever you are sticking it to.

Here is the vinyl removed from its backing, just stuck to the reverse of the transfer tape. It is now ready to be applied to my board.

I carefully placed the tape on the board, positioning the lettering where I wanted it to be. I even measured. a little.

I carefully pulled off the tape and here is my finished sign!

And, here it is on my newly painted mantel. What do you think?